

I2C
Introduction to I2C
The Inter-Integrated Circuit (I2C) protocol is a synchronous, multi-master, multi-slave serial communication standard. It's designed for short-distance communication between integrated circuits, commonly used to interface microcontrollers with peripherals such as sensors, displays, and memory devices.
I2C Protocol Fundamentals
- Master-Slave Architecture: Communication is initiated and controlled by a master device, with slave devices responding to requests.
- Two-Wire Interface: I2C utilizes two bidirectional lines:
- SCL (Serial Clock Line): Synchronizes data transfer between devices.
- SDA (Serial Data Line): Carries data between the master and slave devices.
- Addressing: Each slave device is assigned a unique 7-bit or 10-bit address, allowing the master to selectively communicate with specific devices.
- Speed Modes: I2C supports various speed modes, including Standard Mode (100 kHz), Fast Mode (400 kHz), and High-Speed Mode (3.4 MHz).
I2C Implementation on Mecha Comet GPIO
The Mecha Comet device supports I2C communication through its GPIO pins, allowing seamless integration with various I2C-compatible peripherals. The following sections outline the pin configuration and how to access I2C on the Mecha Comet.
| Function | GPIO Pin |
|---|---|
| I2C2_SCL | GPIO5_IO16 |
| I2C2_SDA | GPIO5_IO17 |
| I2C4_SCL | GPIO5_IO20 |
| I2C4_SDA | GPIO5_IO21 |
How I2C Works Over GPIO
I2C can be implemented in two ways:
- Hardware I2C: Dedicated I2C hardware controllers within the Mecha Comet's processor manage the I2C protocol, offering optimal performance and reliability.
- Bit-Banged I2C: Software-driven implementation of the I2C protocol using general-purpose GPIO pins. This method is less efficient and may be used in situations where hardware I2C resources are limited.
The Mecha Comet prioritizes hardware I2C for its superior performance and robustness.
Accessing I2C on Debian-Based Systems
Checking Available I2C Buses
$ ls /dev/i2c-*
This will list available I2C buses, typically /dev/i2c-1, /dev/i2c-2, etc.
Enabling I2C
Ensure the I2C kernel module is loaded:
$ sudo modprobe i2c-dev
For persistent enabling, add it to /etc/modules:
echo "i2c-dev" | sudo tee -a /etc/modules
Installing I2C Utilities
$ sudo apt update && sudo apt install -y i2c-tools
Detecting I2C Devices
$ sudo i2cdetect -y 2
This will scan I2C bus 2 for connected devices.
Working with I2C To Read BMP180 Sensor Data
To demonstrate I2C communication on the Mecha Comet, this section uses the BMP180 sensor. The illustrated I2C interaction techniques are applicable to all I2C devices that can be integrated with the Mecha Comet.
BMP180 sensor and pin-out
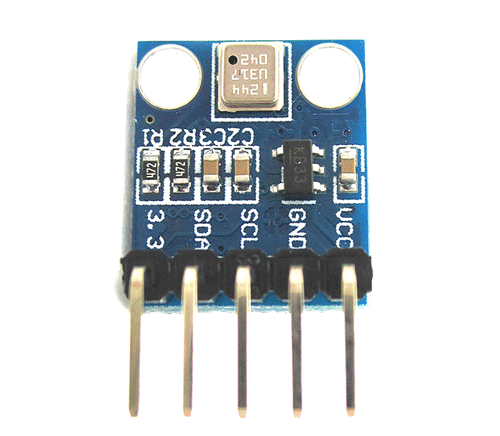
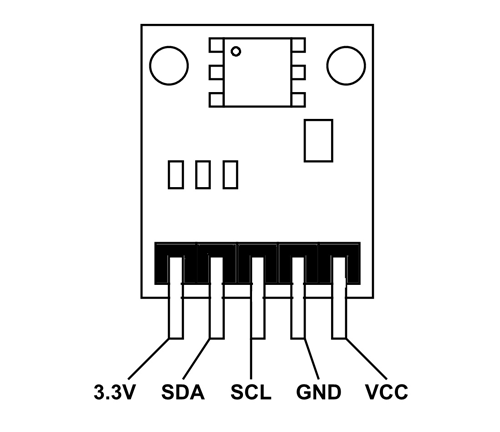
BMP180 Pin Configuration
BMP180 is available in two modules. One is Five pin module and other is Four pin module. With Five pin module we have additional +3.3V pin which is absent in four pin module. Other than that the functioning is same.
| Pin Name | Description |
|---|---|
| VCC | Connected to +5V |
| GND | Connected to ground. |
| SDA | Serial Data pin (I2C interface) |
| SCL | Serial Clock pin (I2C interface) |
| 3.3V | If +5V is not present. Can power module by connecting +3.3V to this pin. |
BMP180 MODULE Features
- Can measure temperature and altitude.
- Pressure range: 300 to 1100hPa
- High relative accuracy of ±0.12hPa
- Can work on low voltages
- 3.4Mhz I2C interface
- Low power consumption (3uA)
- Pressure conversion time: 5msec
- Potable size
BMP180 MODULE Specifications
- Operating voltage of BMP180: 1.3V – 3.6V
- Input voltage of BMP180MODULE: 3.3V to 5.5V
- Peak current : 1000uA
- Consumes 0.1uA standby
- Maximum voltage at SDA , SCL : VCC + 0.3V
- Operating temperature: -40ºC to +80ºC
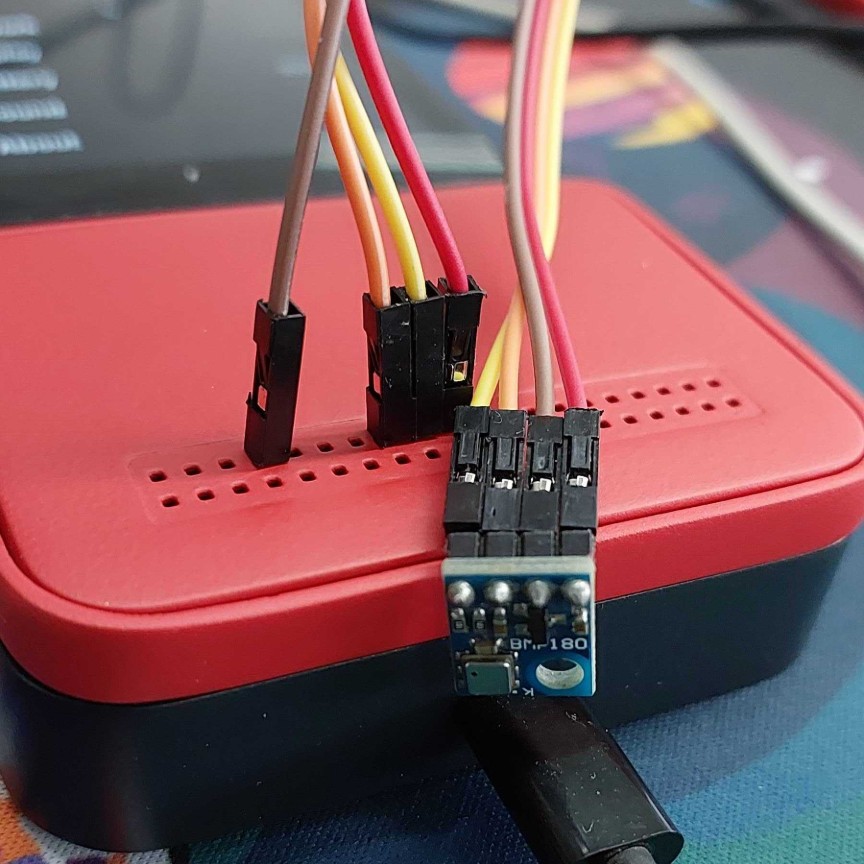
How to attach Sensor to Mecha comet gpio
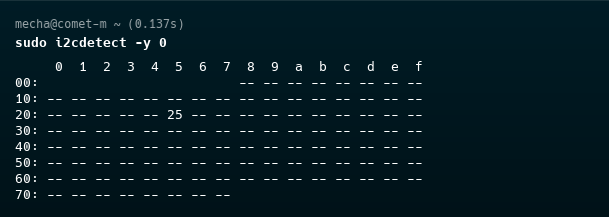
To detect i2c device on the comet device use the following command
sudo i2cdetect -y 0
This is how output looks like on the device
Example Code demonstrates how to read data from the BMP180 sensor using I2C on the Mecha Comet.
- Python
- C
Using Python
import time
from smbus2 import SMBus

I2C_BUS = 2
BMP180_ADDRESS = 0x77

# Calibration register addresses
CALIBRATION_REGS = {
    'AC1': 0xAA, 'AC2': 0xAC, 'AC3': 0xAE,
    'AC4': 0xB0, 'AC5': 0xB2, 'AC6': 0xB4,
    'B1':  0xB6, 'B2':  0xB8, 'MB':  0xBA,
    'MC':  0xBC, 'MD':  0xBE,
}

def read_int16(bus, addr, signed=True):
    hi = bus.read_byte_data(BMP180_ADDRESS, addr)
    lo = bus.read_byte_data(BMP180_ADDRESS, addr + 1)
    val = (hi << 8) + lo
    return val if not signed else val - 65536 if val > 32767 else val

def read_calibration_data(bus):
 return {
    k: read_int16(bus, v, signed=(k not in ['AC4', 'AC5', 'AC6']))
    for k, v in CALIBRATION_REGS.items()
    }


def read_raw_temperature(bus):
    bus.write_byte_data(BMP180_ADDRESS, 0xF4, 0x2E)
    time.sleep(0.005)
    msb = bus.read_byte_data(BMP180_ADDRESS, 0xF6)
    lsb = bus.read_byte_data(BMP180_ADDRESS, 0xF7)
    return (msb << 8) + lsb

def read_raw_pressure(bus, oss=0):
    bus.write_byte_data(BMP180_ADDRESS, 0xF4, 0x34 + (oss << 6))
    time.sleep(0.005)
    msb = bus.read_byte_data(BMP180_ADDRESS, 0xF6)
    lsb = bus.read_byte_data(BMP180_ADDRESS, 0xF7)
    xlsb = bus.read_byte_data(BMP180_ADDRESS, 0xF8)
    return ((msb << 16) + (lsb << 8) + xlsb) >> (8 - oss)

def calculate_true_temperature(ut, calib):
    x1 = ((ut - calib['AC6']) * calib['AC5']) >> 15
    x2 = (calib['MC'] << 11) // (x1 + calib['MD'])
    b5 = x1 + x2
    temp = (b5 + 8) >> 4
    return temp, b5

def calculate_true_pressure(up, b5, calib, oss=0):
    b6 = b5 - 4000
    x1 = (calib['B2'] * ((b6 * b6) >> 12)) >> 11
    x2 = (calib['AC2'] * b6) >> 11
    x3 = x1 + x2
    b3 = (((calib['AC1'] * 4 + x3) << oss) + 2) >> 2

    x1 = (calib['AC3'] * b6) >> 13
    x2 = (calib['B1'] * ((b6 * b6) >> 12)) >> 16
    x3 = ((x1 + x2) + 2) >> 2
    b4 = (calib['AC4'] * (x3 + 32768)) >> 15
    b7 = (up - b3) * (50000 >> oss)

    if b7 < 0x80000000:
        p = (b7 << 1) // b4
    else:
        p = (b7 // b4) << 1

    x1 = (p >> 8) * (p >> 8)
    x1 = (x1 * 3038) >> 16
    x2 = (-7357 * p) >> 16
    return p + ((x1 + x2 + 3791) >> 4)

def main():
    with SMBus(I2C_BUS) as bus:
        calib = read_calibration_data(bus)

        ut = read_raw_temperature(bus)
        temp, b5 = calculate_true_temperature(ut, calib)

        up = read_raw_pressure(bus)
        pressure = calculate_true_pressure(up, b5, calib)

        print(f"Temperature: {temp / 10:.1f} °C")
        print(f"Pressure: {pressure / 100:.2f} hPa")

if __name__ == "__main__":
    main()
To Run the Python Script on the Mecha Comet:
- Save the script as
bmp180_read.py. - Make sure you have
smbus2installed:$ pip3 install smbus2 - Run the script:
$ python3 bmp180_read.py - Ensure you have the necessary permissions to access GPIO lines. You may need to run the script with
sudoor add your user to thegpiogroup. - Check the BMP180 connected to I2C pins on the Mecha Comet to see if it read the temperature and pressure data correctly.
Using C
#include <stdio.h>
#include <stdlib.h>
#include <stdint.h>
#include <fcntl.h>
#include <linux/i2c-dev.h>
#include <sys/ioctl.h>
#include <unistd.h>
#define I2C_DEVICE "/dev/i2c-2" // I2C bus device
#define BMP180_ADDRESS 0x77 // BMP180 sensor I2C address
// Function to read a 16-bit value from the BMP180 sensor
int16_t bmp180_read_int16(int file, uint8_t reg) {
uint8_t msb, lsb;
// Write the register address
if (write(file, ®, 1) != 1) {
perror("Failed to write to the I2C bus");
exit(EXIT_FAILURE);
}
// Read the most significant byte (MSB)
if (read(file, &msb, 1) != 1) {
perror("Failed to read from the I2C bus");
exit(EXIT_FAILURE);
}
// Read the least significant byte (LSB)
if (read(file, &lsb, 1) != 1) {
perror("Failed to read from the I2C bus");
exit(EXIT_FAILURE);
}
// Combine MSB and LSB to form a 16-bit value
return (int16_t)((msb << 8) | lsb);
}
int main() {
int file;
// Open the I2C device
if ((file = open(I2C_DEVICE, O_RDWR)) < 0) {
perror("Failed to open the I2C device");
exit(EXIT_FAILURE);
}
// Set the I2C slave address
if (ioctl(file, I2C_SLAVE, BMP180_ADDRESS) < 0) {
perror("Failed to acquire bus access and/or talk to slave");
exit(EXIT_FAILURE);
}
// Read calibration data from the sensor
uint16_t ac1 = bmp180_read_int16(file, 0xAA);
uint16_t ac2 = bmp180_read_int16(file, 0xAC);
uint16_t ac3 = bmp180_read_int16(file, 0xAE);
uint16_t ac4 = bmp180_read_int16(file, 0xB0);
uint16_t ac5 = bmp180_read_int16(file, 0xB2);
uint16_t ac6 = bmp180_read_int16(file, 0xB4);
int16_t b1 = bmp180_read_int16(file, 0xB6);
int16_t b2 = bmp180_read_int16(file, 0xB8);
int16_t mb = bmp180_read_int16(file, 0xBA);
int16_t mc = bmp180_read_int16(file, 0xBC);
int16_t md = bmp180_read_int16(file, 0xBE);
// Trigger temperature measurement
uint8_t temp_cmd[] = {0xF4, 0x2E};
if (write(file, temp_cmd, 2) != 2) {
perror("Failed to write temperature command");
exit(EXIT_FAILURE);
}
sleep(1); // Wait for conversion
int16_t ut = bmp180_read_int16(file, 0xF6);
// Trigger pressure measurement (OSS = 0 for standard resolution)
uint8_t pressure_cmd[] = {0xF4, 0x34};
if (write(file, pressure_cmd, 2) != 2) {
perror("Failed to write pressure command");
exit(EXIT_FAILURE);
}
sleep(1); // Wait for conversion
// Read pressure raw data
uint16_t msb = bmp180_read_int16(file, 0xF6);
uint16_t lsb = bmp180_read_int16(file, 0xF8);
uint16_t xlsb = bmp180_read_int16(file, 0xFA);
int32_t up = ((msb << 16) | (lsb << 8) | xlsb) >> (8 - 3);
// Calculate true temperature
int32_t x1 = ((ut - ac6) * ac5) >> 15;
int32_t x2 = (mc << 11) / (x1 + md);
int32_t b5 = x1 + x2;
int32_t temperature = (b5 + 8) >> 4;
// Calculate true pressure
int32_t b6 = b5 - 4000;
x1 = (b2 * (b6 * b6) >> 12) >> 11;
x2 = (ac2 * b6) >> 11;
int32_t x3 = x1 + x2;
int32_t b3 = (((int32_t)ac1 * 4 + x3) + 2) >> 2;
x1 = (ac3 * b6) >> 13;
x2 = (b1 * ((b6 * b6) >> 12)) >> 16;
x3 = ((x1 + x2) + 2) >> 2;
uint32_t b4 = (ac4 * (uint32_t)(x3 + 32768)) >> 15;
uint32_t b7 = ((uint32_t)up - b3) * (50000 >> 3);
int32_t p;
if (b7 < 0x80000000) {
p = (b7 << 1) / b4;
} else {
p = (b7 / b4) << 1;
}
x1 = (p >> 8) * (p >> 8);
x1 = (x1 * 3038) >> 16;
x2 = (-7357 * p) >> 16;
int32_t pressure = p + ((x1 + x2 + 3791) >> 4);
// Display results
printf("Temperature: %d.%d °C\n", temperature / 10, abs(temperature % 10));
printf("Pressure: %d.%02d hPa\n", pressure / 100, pressure % 100);
// Close the I2C device
close(file);
return EXIT_SUCCESS;
}
Compiling and Running the Code on Mecha Comet
To compile and run the provided C code on the Mecha Comet device, follow these steps:
-
Save the code to a file, e.g.,
bmp180_read.c. -
Compile the code using the GCC compiler:
$ gcc -o bmp180_read bmp180_read.c -
Run the compiled program with appropriate permissions:
sudo ./bmp180_readEnsure the BMP180 sensor is properly connected to the I2C pins on the Mecha Comet before running the program.
Rust Code Example
Use Cases
- Sensor Integration I2C enables seamless data acquisition from a wide range of environmental sensors, including temperature, humidity, and barometric pressure sensors, facilitating real-time monitoring and data logging.
- Peripheral Interfacing I2C simplifies the connection and control of peripheral devices such as OLED displays for visual output, Real-Time Clocks (RTCs) for accurate timekeeping, and EEPROM chips for non-volatile data storage.
- Microcontroller Intercommunication I2C provides a robust and efficient method for establishing communication between microcontrollers, such as interfacing the Mecha Comet with Arduino or other MCU platforms, enabling distributed processing and control.