
Flashing Instructions
Flashing the Mecha Comet with the latest operating system image is a crucial step to ensure that the device is ready for use. Whether you are setting up your Mecha Comet for the first time or updating it to a newer version, this guide provides you with all the necessary steps to successfully flash the filesystem (rootfs/os) onto the device.
The flashing process involves using the Universal Update Utility (uuu), a tool that communicates with the device over USB, allowing you to load the OS image onto the Mecha Comet. This guide will walk you through the entire process, from preparing your environment to getting your device up and running.
By the end of this guide, you will have a fully functional Mecha Comet device running the latest filesystem, ready for your projects and experiments.
Prerequisites
Before beginning the flashing process, ensure you have the following items in place:
-
Host Machine
This is the computer that will be used to run the flashing utility and establish communication with the Mecha Comet over USB. Your host machine must meet the following criteria:- It should be running one of the supported operating systems:
- Linux (Ubuntu, Debian, or any other Linux-based OS)
- Windows
- macOS
The host machine will be responsible for running the flashing utility and interacting with the device during the process.
- It should be running one of the supported operating systems:
-
USB A to USB A Cable
You’ll need a USB A to USB A cable to connect the Mecha Comet to the host machine. This cable facilitates data transfer between the devices during the flashing process. Ensure that the cable is in good working condition and that both ends fit securely in the respective USB ports on the Mecha Comet and the host machine.
Steps to Flash the Device
Now, let’s walk through the required steps to flash your Mecha Comet device.
1. Installing the uuu Flashing Utility
The Universal Update Utility (uuu) is essential for flashing the operating system image onto your Mecha Comet device. The installation process varies depending on the operating system you’re using. Follow the instructions for your platform below.
Linux
If you’re using a Linux-based operating system (such as Ubuntu, Debian, or Fedora), follow these steps:
- For Ubuntu/Debian-based distributions:
-
Open a terminal window.
-
Install the
uuutool using the package manager with the following command:$ sudo apt-get install uuu
-
- For other Linux distributions (using precompiled binaries):
- Download the precompiled binaries for your system from the official GitHub page.
- Extract the contents of the downloaded archive and follow the instructions to set up the utility.
Windows
If you're using Windows, follow these steps to install the utility:
- Go to the official GitHub page and download the
uuu.exefile. - Place the
uuu.exefile in a convenient location on your computer (e.g.,C:\uuu). - Run the executable to use the flashing utility from the Command Prompt.
macOS
For macOS users, the easiest way to install the uuu utility is through Homebrew:
-
Open a terminal window.
-
Install
uuuby running the following command:$ brew install uuu
If you're not using Homebrew, you can use precompiled Binaries for mac
-
For Intel Macs, download from the official GitHub page.
-
For M1 Macs, download from the official GitHub page
Source Code (All Platforms)
If you prefer to build the utility from source, follow these steps:
-
Clone the repository:
$ git clone https://github.com/nxp-imx/mfgtools.git -
Follow the build instructions provided in the repository for your platform.
To verify the installation, run the following command in your terminal or command prompt:
$ uuu -v
You should see the version information for the uuu utility, confirming that it is installed correctly.
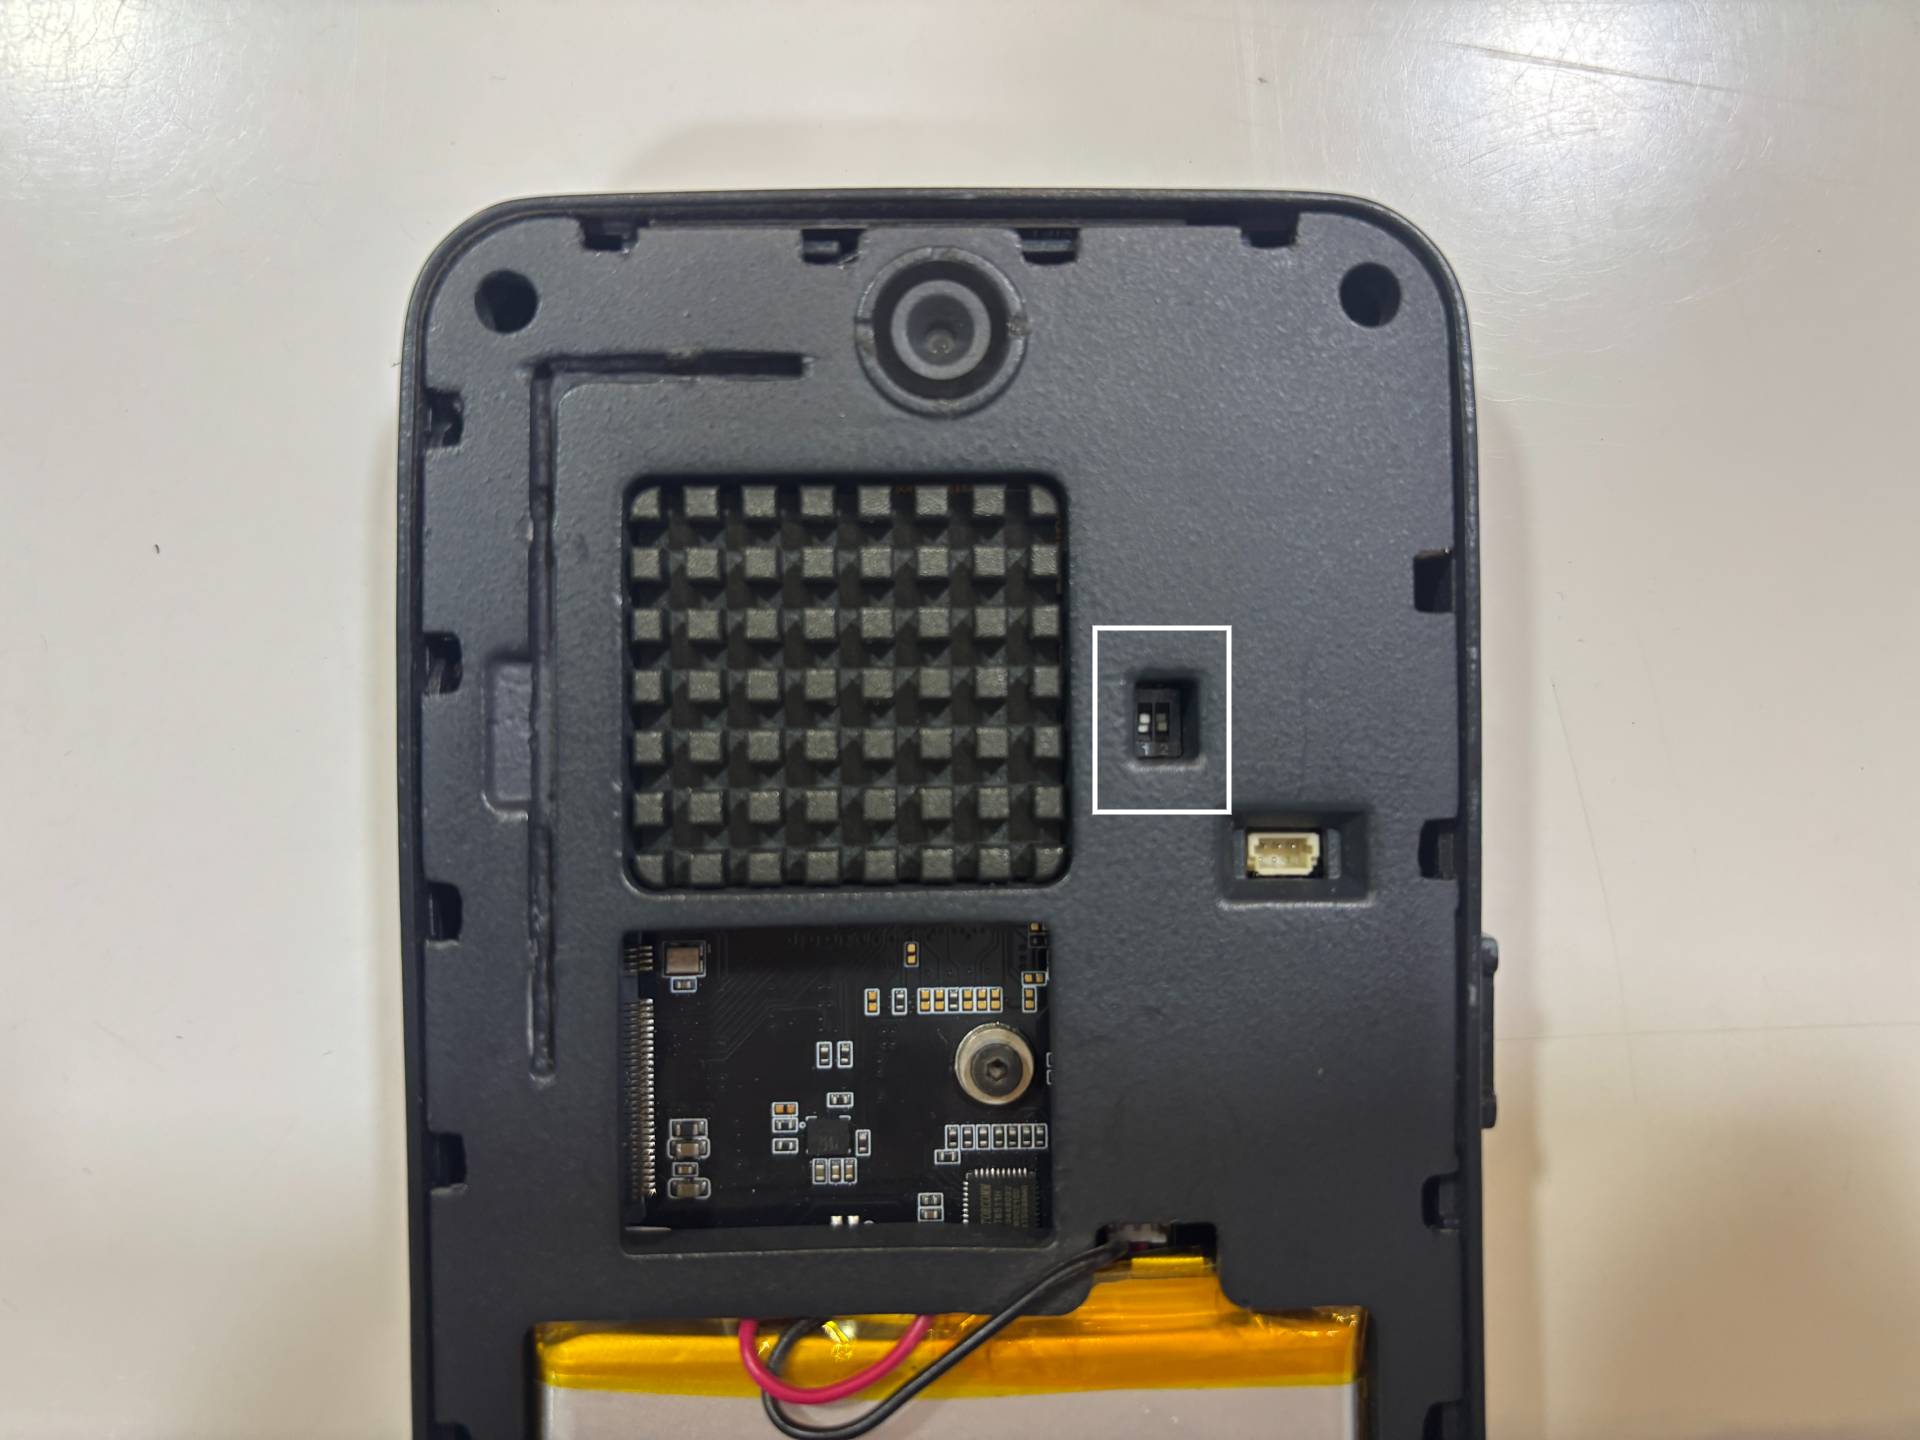
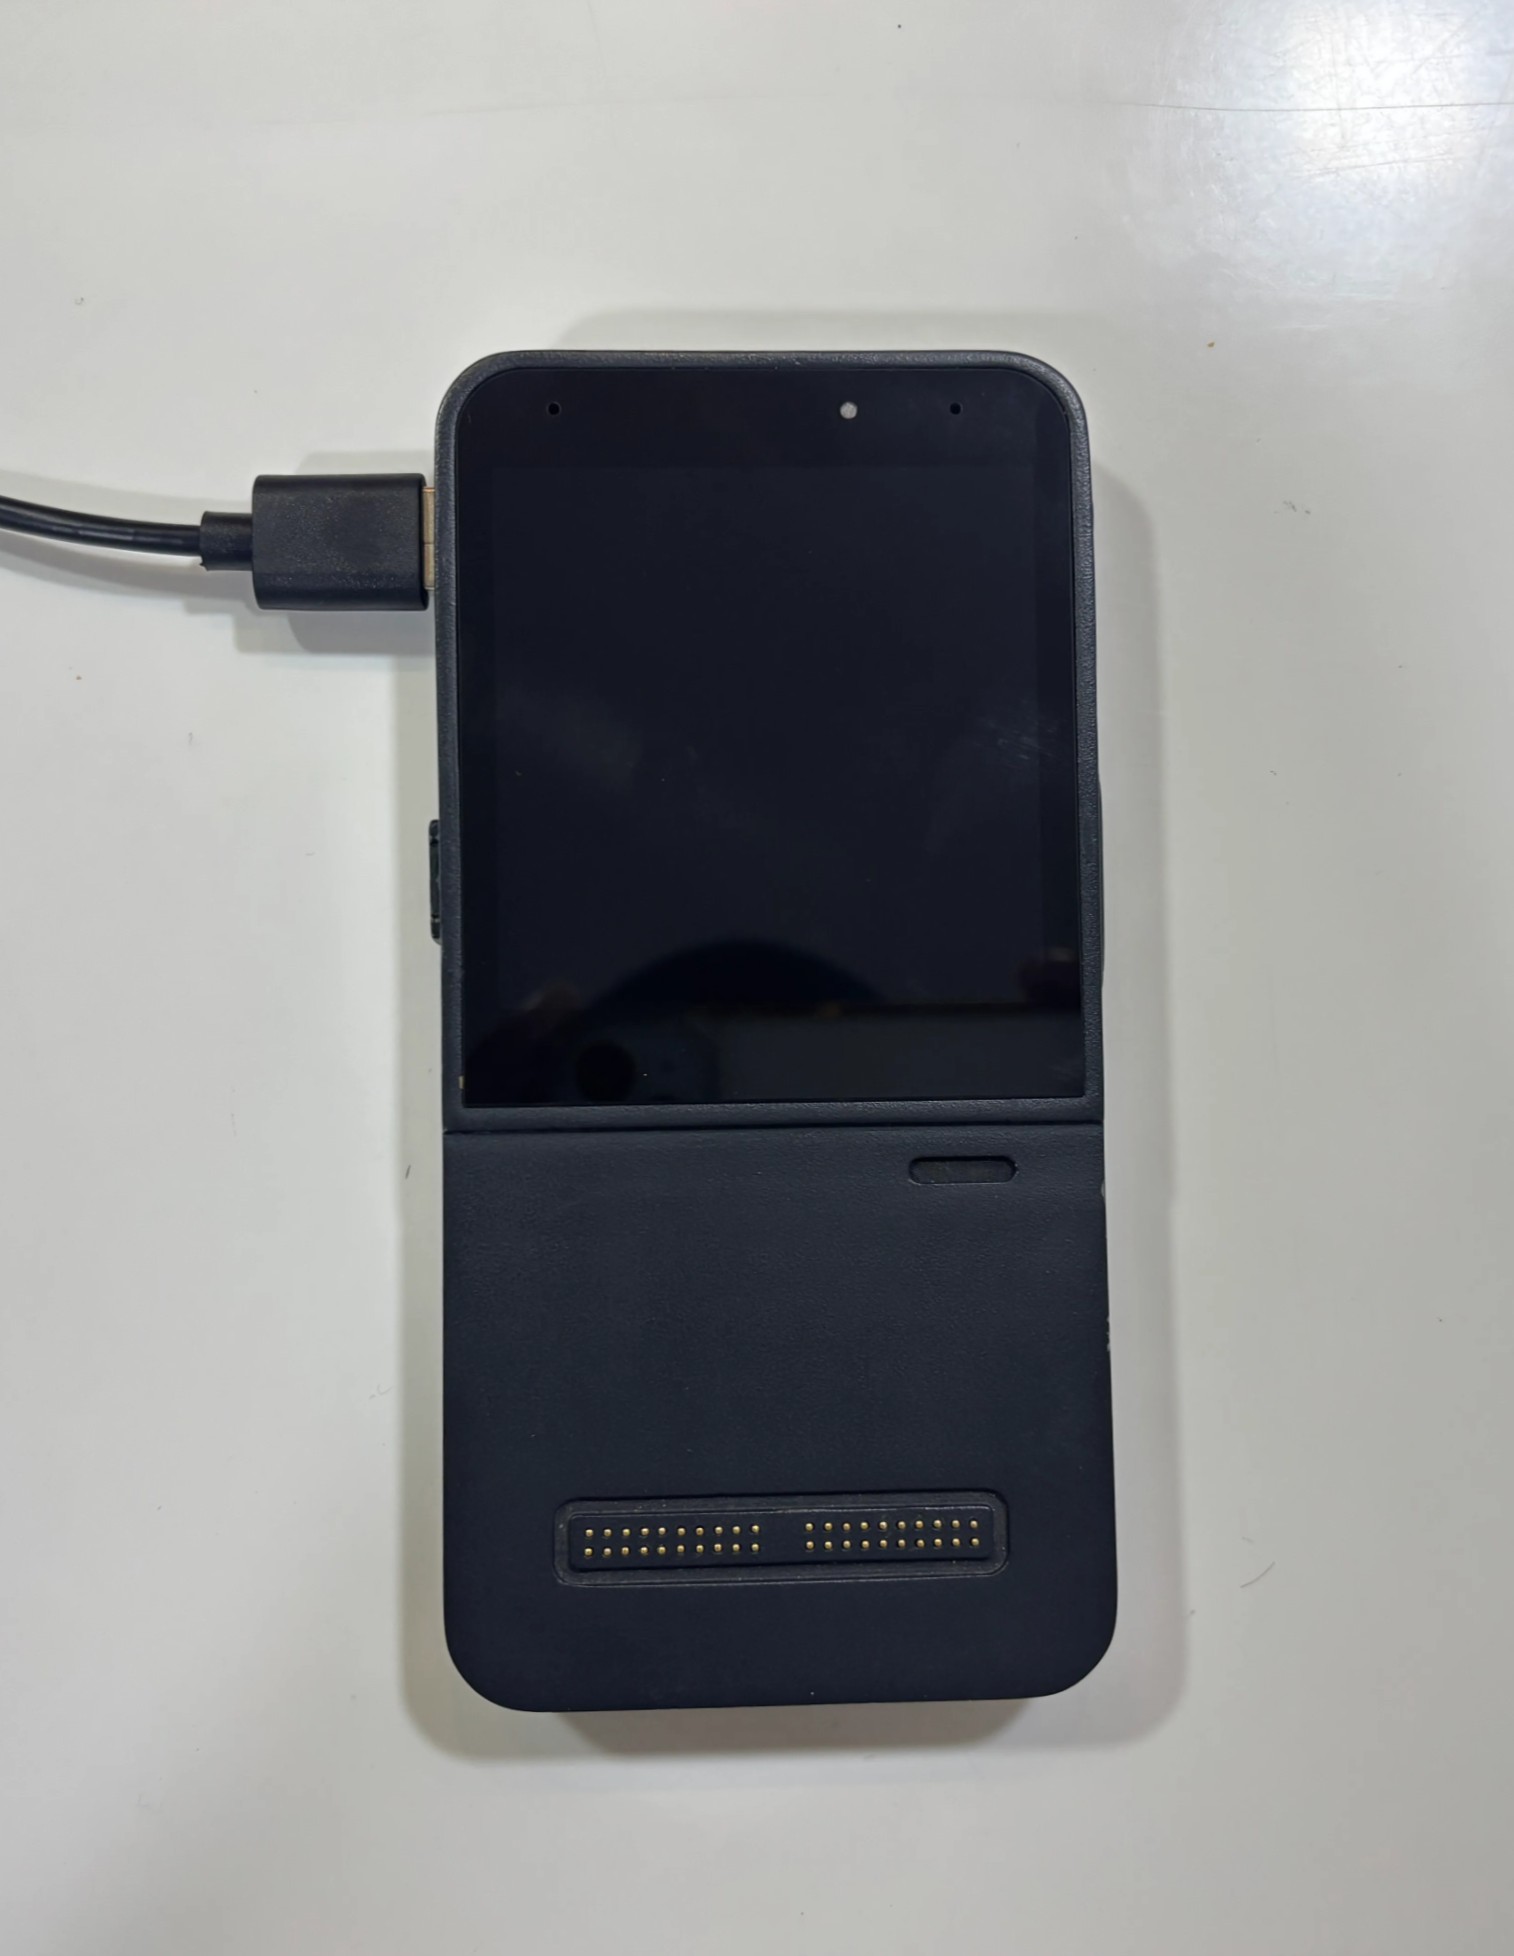
2. Put the Mecha Comet into Flash Mode:
- Ensure your Mecha Comet device is powered off.
- Locate the toggle switch on the back of the device.
- Toggle the switches to the "serial mode" position, this will enable flashing. This position may be indicated by labels or diagrams near the switch.
3. Connect the Mecha Comet to Your Host Machine:
- Use a male-to-male USB cable to connect your Mecha Comet device to your host machine. Ensure the cable is plugged into the first USB port from the top on the Mecha Comet (designated for data transfer or flashing) and any available USB port on your host machine.
4. Verify Device Connection
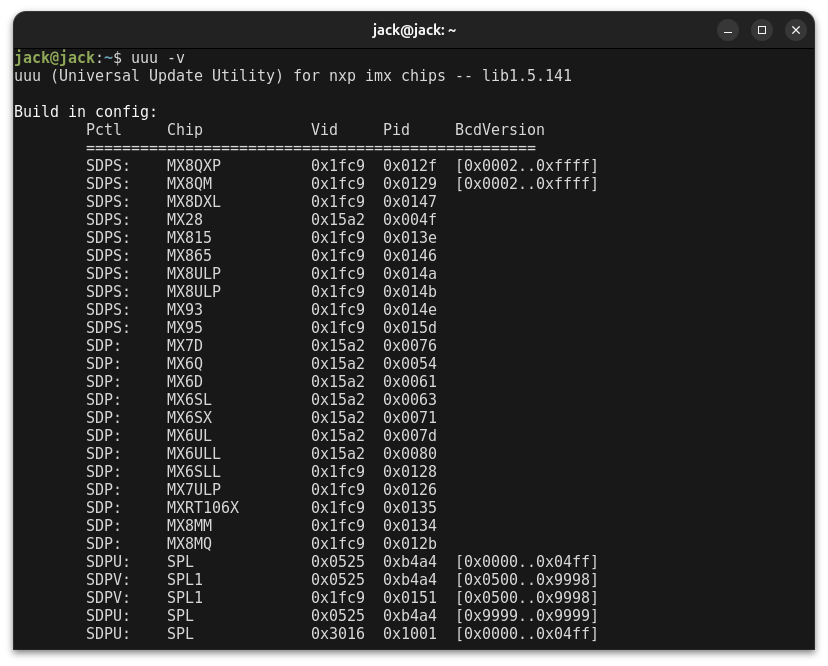
To ensure the host machine detects your Mecha Comet in Flash Mode, run the following command:
$ uuu -lsusb
You should see an entry for a USB device corresponding to NXP or Freescale, which indicates the flashing interface is active and ready.
below is an example of the output you might see:
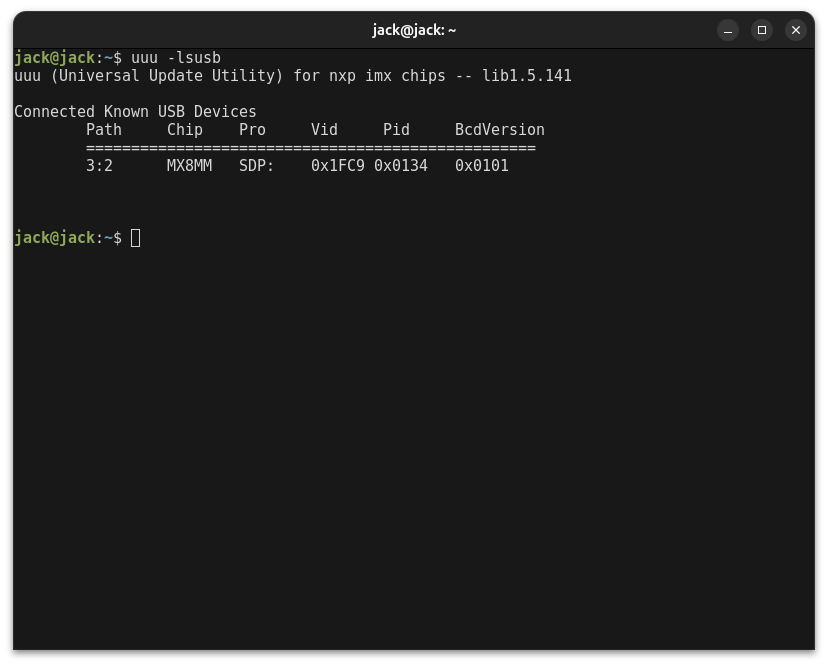
If the device is not detected:
- Double-check the USB connection and cable.
- Ensure the Flash Mode switch is correctly toggled.
- Try a different USB port or cable.
5. Download the Latest Flash Bundle
To flash the Mecha Comet, you will need the appropriate image bundle for your device revision. Please download the correct bundle below:
- Revision 5: Download
mechanix_os_rev5_2025_apr_16.zip - Revision 3: Download
mechanix_os_rev3_2025_apr_16.zip
Make sure you select the revision that matches your Mecha Comet hardware. If you're unsure which revision you have, refer to the image below.
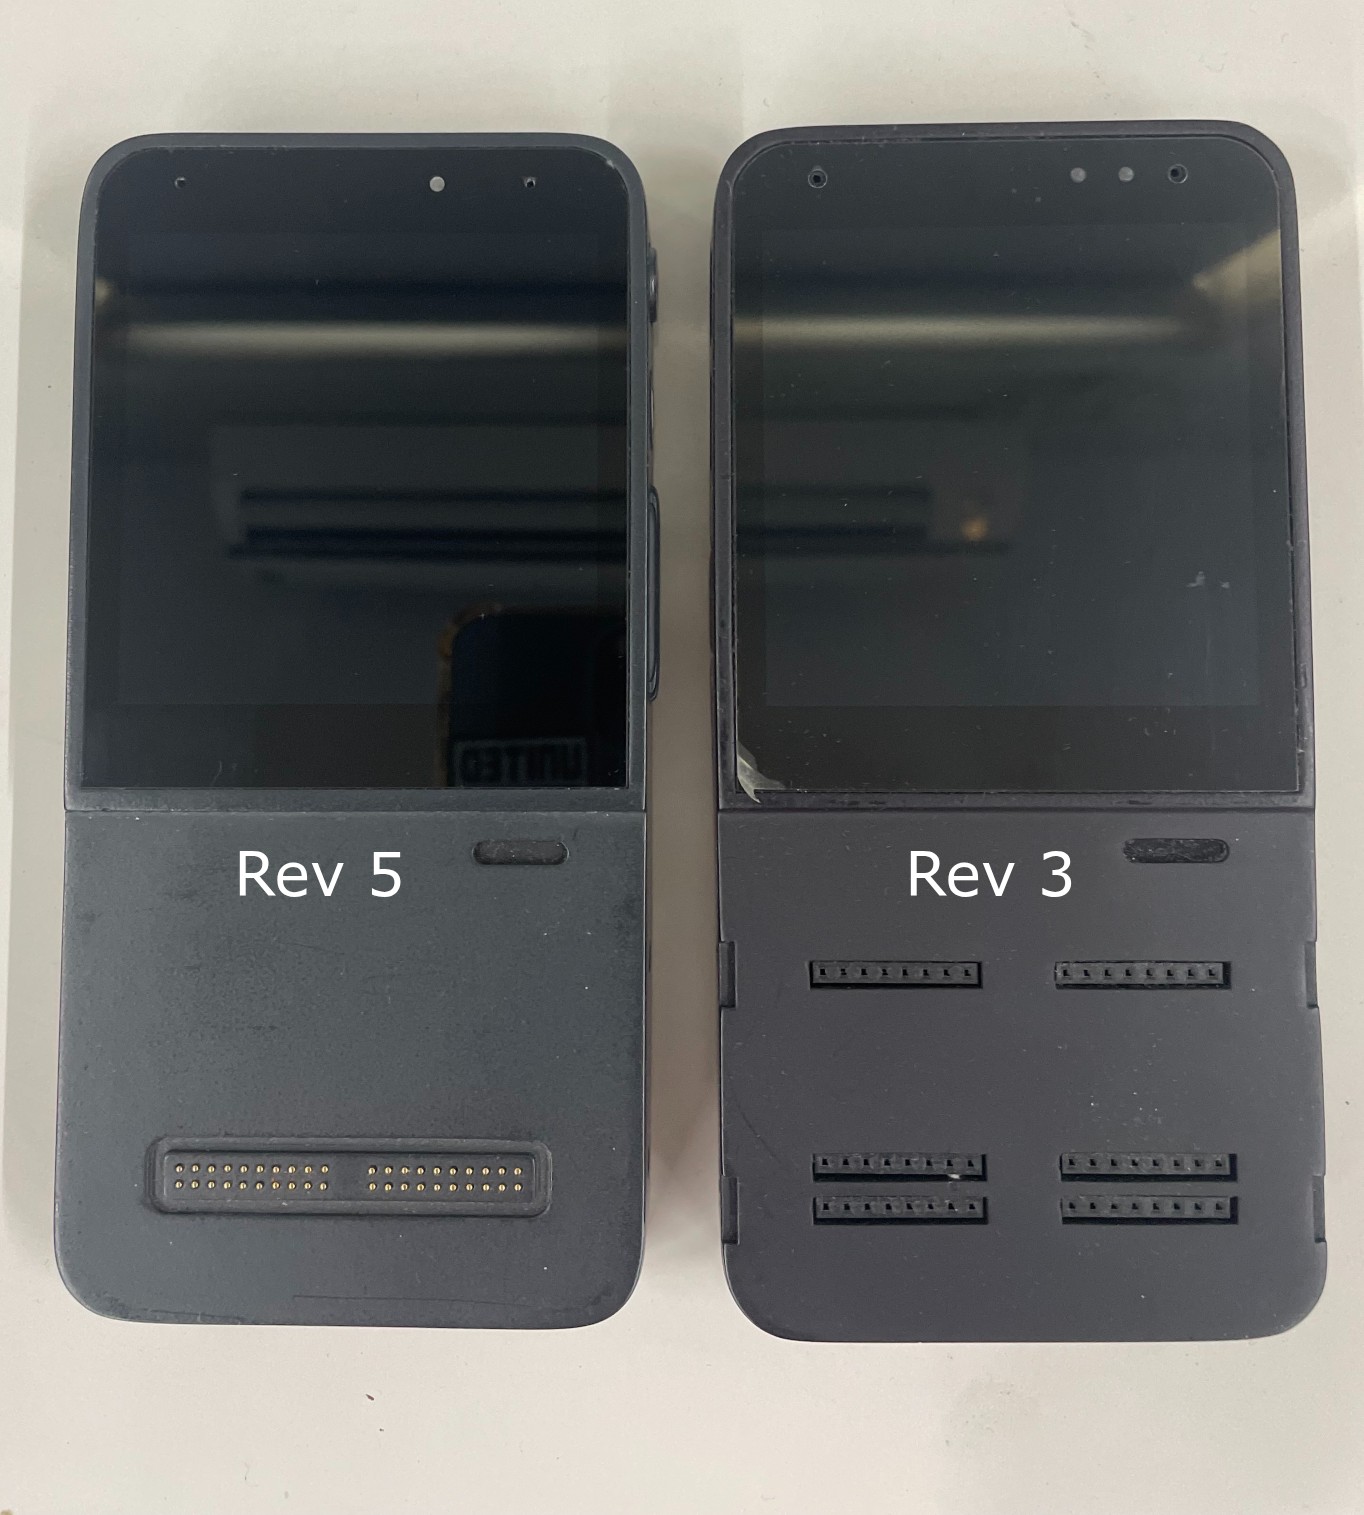
- The main visual difference between the two revisions is the Pogo pin connctor vs female gpio connector.
- Revision 5: The revision 5 Mecha Comet has a Pogo pin connector.
- Revision 3: The revision 3 Mecha Comet has a female gpio connector.
Extract the Bundle
Once downloaded:
- Extract the contents of the
.zipfile into a new folder on your host machine. - After extraction, the folder should contain the following files:
mechanix_os_rev3_2025_apr_11(this can be any folder name that you have extracted)
├── Image
├── debian-image-rootfs.tar.gz
├── flash.auto
├── flash.bin
├── imx8mm-mecha-comet-m-gen1.dtb
└── mecha-comet-m-gen1-mfgtool-initramfs.cpio.gz.u-boot
These files include:
flash.auto: A script used byuuuto automate the flashing sequence.flash.bin: The bootloader binary..dtb: Device Tree Blob that describes the hardware layout..cpio.gz.u-boot: The U-Boot compatible initramfs used during flashing.debian-image-rootfs.tar.gz: The root filesystem archive for the Debian OS.
6. Flash the Image:
-
Execute the following command to initiate the flashing process, by navigating to the directory where you extracted the files:
$ sudo uuu -v -b flash.auto flash.bin debian-image-rootfs.tar.gzsudo: May be required on Linux and macOS for sufficient permissions.uuu: The Universal Update Utility command.v: Enables verbose output, providing more details about the flashing process.b flash.auto: Specifies the configuration file that guides the flashing process.flash.bin: The flash binary file.debian-image-rootfs.tar.gz: The root filesystem image file.
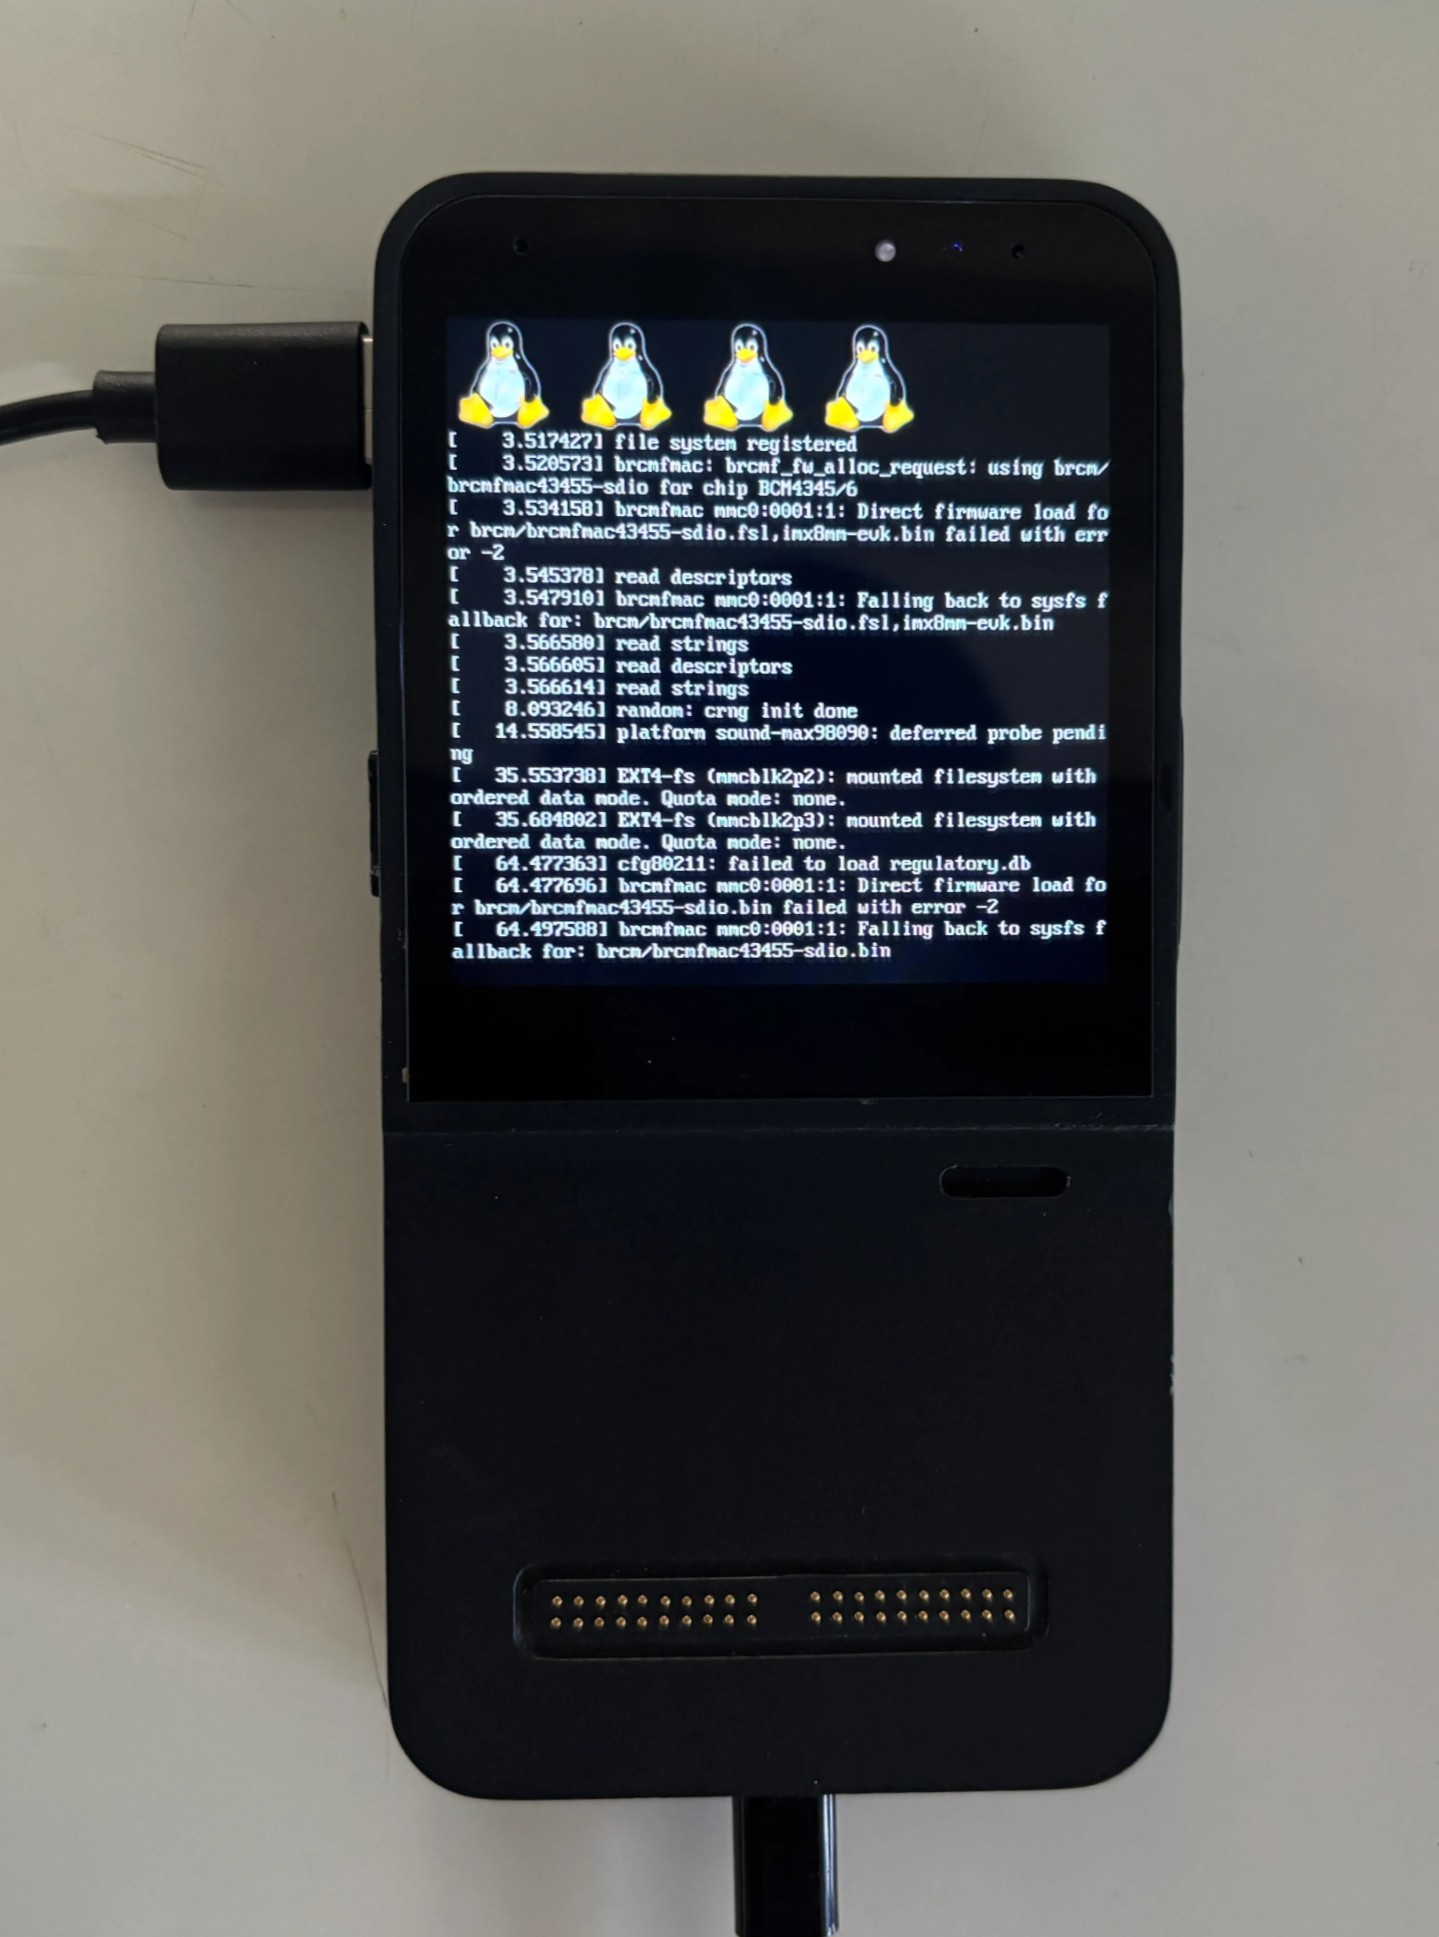
8. Wait for the Flashing to Complete:
- The flashing process will begin automatically after you execute the command.
- Monitor the terminal output carefully. It will display the progress of the flashing operation.
- Do not disconnect the USB cable or power off the Mecha Comet during the flashing process. This could lead to a corrupted installation.
- The process can take several minutes to complete.
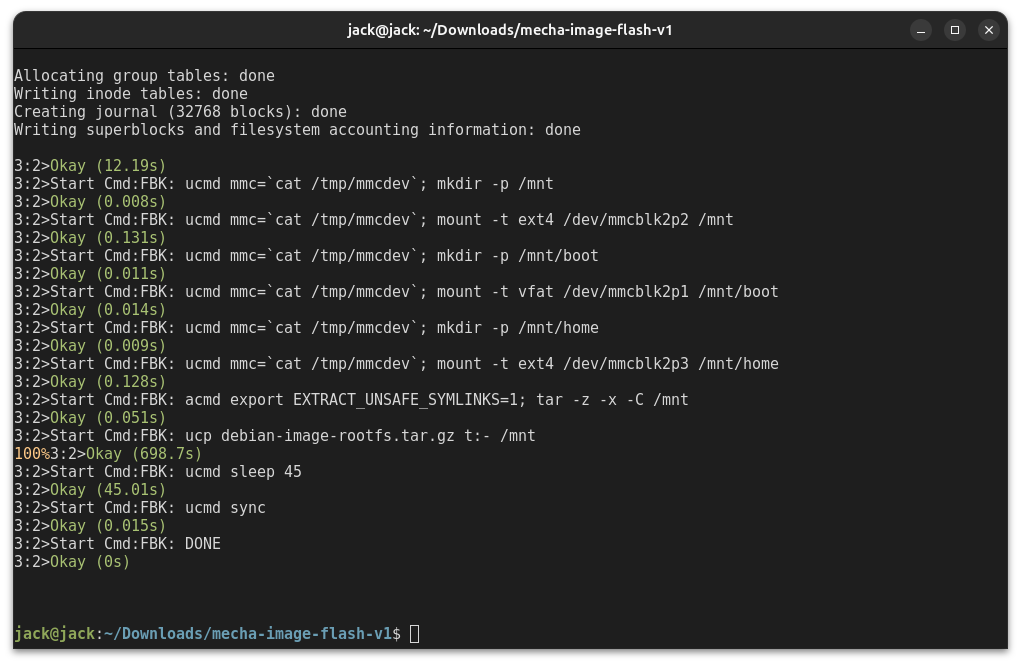
- Once the flashing is complete, you will see something like this in the terminal of your host machine
9. Reboot Your Mecha Comet:
- Once the flashing is successful, you can disconnect the USB cable from your host machine.
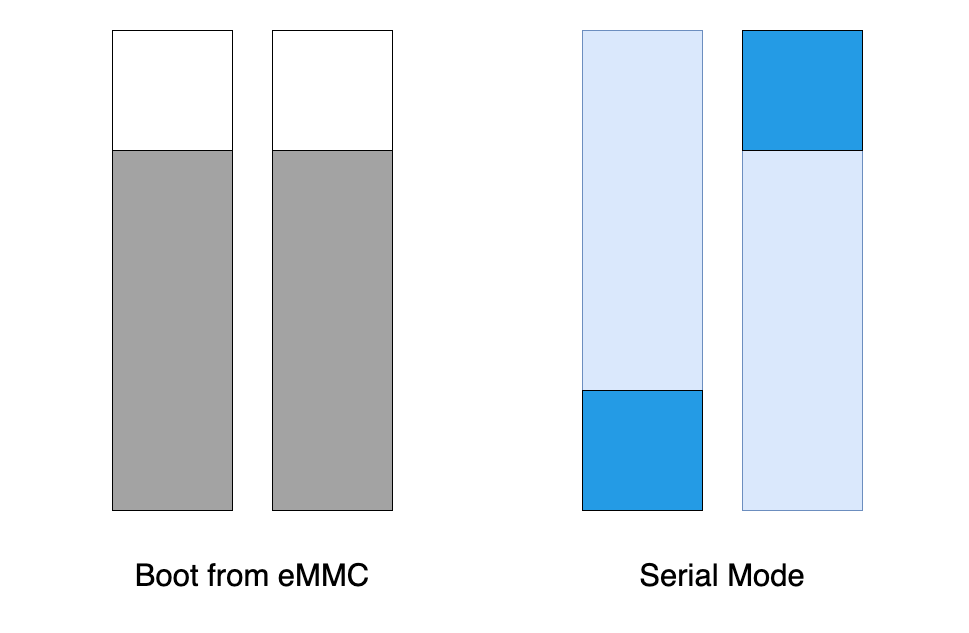
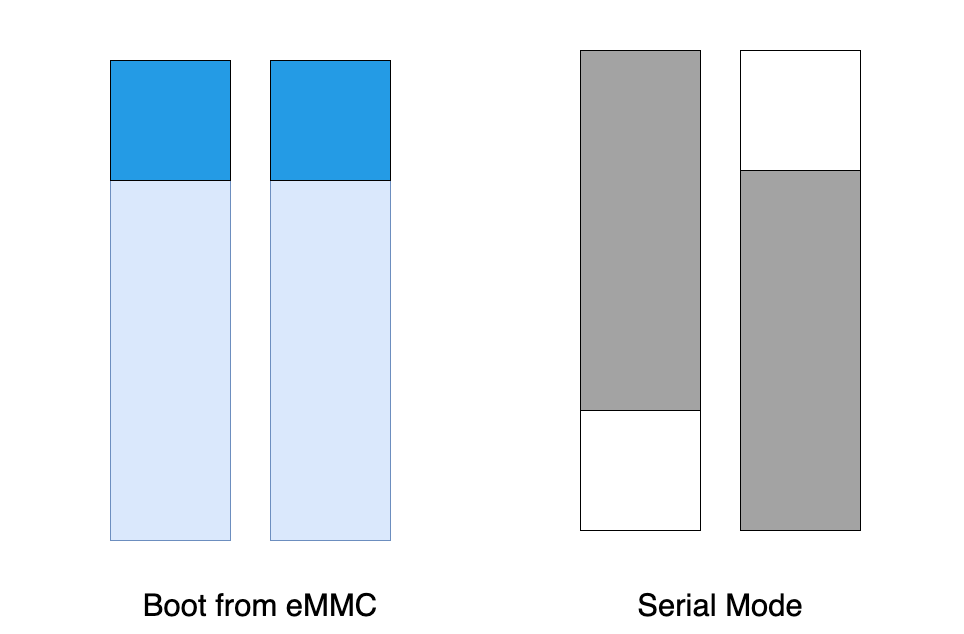
- Toggle the serial switch on the back of the Mecha Comet back to its normal operating position, this will enable booting from the eMMC.
For correct toggle switch position, refer to the Diagram below.
- Power on your Mecha Comet device. It should now boot into the newly flashed filesystem.
Final Notes
- The
flash.autoconfiguration file contains the instructions thatuuufollows to flash the different partitions on the Mecha Comet. - Pay close attention to the terminal output for any error messages during the flashing process. If you encounter errors, double-check your prerequisites, connections, and the commands you executed.
- If the flashing fails, consult the documentation or seek support from the Mecha Comet community.